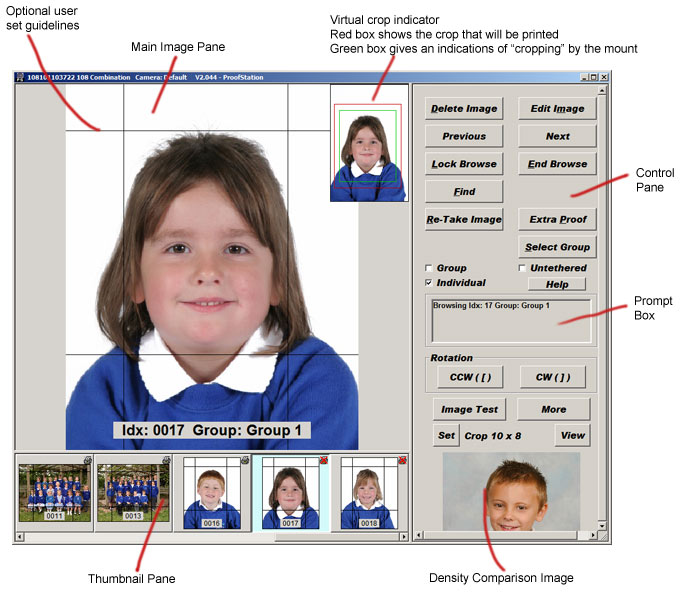
This box is used to prompt you what to do next, let you know what is currently going on and provide additional information when appropriate (for example whilst browsing images).
A comparison image, supplied by Parker Franklin, will be installed along with the software and by default this is the image displayed in the bottom right. It has been checked to give perfect colour balance and density when printed and allows you to check that your camera and lighting are set up for optimum printed results. Note: computer screens generally display inaccurate colour balance and light densities and are affected by different ambient light intensities but if you ensure your image tones on screen match those of the comparison image on the same screen you will get perfect results when the images are printed. As you will almost certainly be using different backdrops to the ones we have used, you may prefer to provide us with your own image, which we will return to you after making any necessary adjustments for a perfect print result. This image can then be used in preference to the default image provided with the software.
There are a variety of buttons for controlling the operation of the software. They will not all be displayed all the time, only appearing when they are relevant. Most buttons have one letter of their text underlined. Typing that underlined letter will “click” the button; no Control or Alt key is generally required (See Shortcuts).
![]() Removes the image from the database. Normally it is not necessary to delete images; if you are unhappy with an image then simply take another, throw the proof order form for the bad image away and it can never be ordered. However if you are sending the job to Parker Franklin to print proof cards then we will print proof cards for every image in the database and you will be charged for them, so it is best to delete any you are unhappy with. Also, again with proof cards, if your proof card has multiple images on it then it is vitally important that you ensure there are exactly that number of images of each subject in the database, otherwise when the proof cards are being printed they will go out of synchronisation. (tip: to check for this adjust the size of the thumbnail pane until an exact multiple of the number of images on the proof card is being displayed, then paging through them will quickly identify any occasions with the wrong number of images). This button can be used both when taking the images or later when browsing. It will only ever delete the image displayed in the main image pane, to delete multiple images, first select them using the thumbnails and then right click to get the thumbnail menu and use the delete option there.
Removes the image from the database. Normally it is not necessary to delete images; if you are unhappy with an image then simply take another, throw the proof order form for the bad image away and it can never be ordered. However if you are sending the job to Parker Franklin to print proof cards then we will print proof cards for every image in the database and you will be charged for them, so it is best to delete any you are unhappy with. Also, again with proof cards, if your proof card has multiple images on it then it is vitally important that you ensure there are exactly that number of images of each subject in the database, otherwise when the proof cards are being printed they will go out of synchronisation. (tip: to check for this adjust the size of the thumbnail pane until an exact multiple of the number of images on the proof card is being displayed, then paging through them will quickly identify any occasions with the wrong number of images). This button can be used both when taking the images or later when browsing. It will only ever delete the image displayed in the main image pane, to delete multiple images, first select them using the thumbnails and then right click to get the thumbnail menu and use the delete option there.
![]()
![]()
Available when taking group images (see also Group/Individual below). When taking group images it is generally wise to take several images and the Previous and Next buttons can be used to select the best one, which is accepted using this button. More than one image can be accepted and when done the End Accept button is clicked and all the other images are rejected.
![]() Available whenever some images have been taken. On entering browse mode you can step back and forth through the images you have taken. To speed this process up a lower resolution image is used and double clicking the Main Image will load up the full resolution image.
Available whenever some images have been taken. On entering browse mode you can step back and forth through the images you have taken. To speed this process up a lower resolution image is used and double clicking the Main Image will load up the full resolution image.
![]() Available whenever you are in browse mode. Any new images being taken will be queued up until browse mode is unlocked instead of automatically ending the browse session. This is useful when an assistant is possibly showing a customer the previous set of images whilst the photographer is getting on with the next set. An automatic timeout on the lock can also be set up in the program settings.
Available whenever you are in browse mode. Any new images being taken will be queued up until browse mode is unlocked instead of automatically ending the browse session. This is useful when an assistant is possibly showing a customer the previous set of images whilst the photographer is getting on with the next set. An automatic timeout on the lock can also be set up in the program settings.
![]() Available whilst browsing. Not generally needed as if browsing is active and a new image is detected, browsing is automatically ended and the image processed in the normal way (see also Lock Browse above).
Available whilst browsing. Not generally needed as if browsing is active and a new image is detected, browsing is automatically ended and the image processed in the normal way (see also Lock Browse above).
![]() Available whilst browsing or taking a set of group images. Click to view the previous image. The left arrow key also browses to the previous image. If the left arrow key is hit whilst not browsing, browsing will be entered starting with the previous image to the most recent one taken.
Available whilst browsing or taking a set of group images. Click to view the previous image. The left arrow key also browses to the previous image. If the left arrow key is hit whilst not browsing, browsing will be entered starting with the previous image to the most recent one taken.
![]() Available whilst browsing or taking a set of group images. Click to view the next image. The right arrow key also browses to the next image. If the right arrow key is hit whilst not browsing, browsing will be entered starting with the most recent image taken.
Available whilst browsing or taking a set of group images. Click to view the next image. The right arrow key also browses to the next image. If the right arrow key is hit whilst not browsing, browsing will be entered starting with the most recent image taken.
![]() Available whilst browsing. Clicking this button allows specific images to be searched for. The following dialog box below will appear:
Available whilst browsing. Clicking this button allows specific images to be searched for. The following dialog box below will appear:
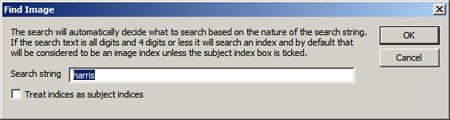
Select the search criterion, enter the details and click OK to do the search. If successful the browse will immediately pull up the found image. A number of 4 digits or less will be treated as the index number, unless the Treat indices as subject indices box is ticked, in which case it will search for a SIMS subject index. If the search text is 13 digits (excluding spaces) it is assumed to be an order reference (which can be scanned from an order reference barcode). For any other text it will search for a name if subject data (SIMS) is available.
![]()
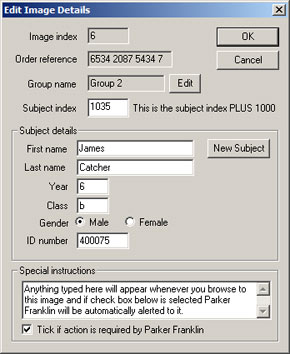
Available whilst browsing. Clicking this button allows the details for a subject’s image to be edited; for example, if the names data provided for a SIMS job had some typing errors in it. Edit the detail in the dialog as necessary. The associated group for an image can be changed here. Anything typed into the special instructions box will appear whenever you browse to this image and if the check box below it is selected Parker Franklin will be automatically alerted to these instructions (eg request for special re-touching etc.).
![]() Available whilst browsing, allowing a poor image to be found and a replacement image to be taken. Note it is often easier to simply take another image and just ignore the poor one.
Available whilst browsing, allowing a poor image to be found and a replacement image to be taken. Note it is often easier to simply take another image and just ignore the poor one.
![]() Available at all times, see Remote Operation. Note: this has been largely superceded by using drag and drop which is generally much easier.
Available at all times, see Remote Operation. Note: this has been largely superceded by using drag and drop which is generally much easier.
![]() Available when running a combined Portrait and Group event or when associating groups with portraits. In these circumstances it is very important that each portrait image is correctly associated with the appropriate group image, so orders placed on the combined portrait and group order form for group images will result in the correct group image being printed. In order to achieve this, a group must be selected; either a new group name is entered or a previous one is used. This is so important that as a reminder when running these jobs the current group name is displayed overlaid on the bottom of each image. It is possible to change the group name associated with an image using the Browse and Edit Image features discussed above or the thumbnail menu, but it far easier to get it right first time!
Available when running a combined Portrait and Group event or when associating groups with portraits. In these circumstances it is very important that each portrait image is correctly associated with the appropriate group image, so orders placed on the combined portrait and group order form for group images will result in the correct group image being printed. In order to achieve this, a group must be selected; either a new group name is entered or a previous one is used. This is so important that as a reminder when running these jobs the current group name is displayed overlaid on the bottom of each image. It is possible to change the group name associated with an image using the Browse and Edit Image features discussed above or the thumbnail menu, but it far easier to get it right first time!
![]() Available when running a combined Portrait and Group event. Use these radio buttons to select whether you are currently taking individual portraits or group images. When group images are selected, several can be taken sequentially and then the Next and Previous buttons (see above) used to find the best image and the Accept Image button (see above) used to accept that image; the remainder are discarded. For the individual images to be correctly associated with these group images it is essential that the group selected by Select Group (see above) matches that selected when the group image is taken. Note: a particular group image does not need to be taken at the same time as the individuals from within that group, it can be taken earlier or later, it is only important that the selected group names match when the images are being taken.
Available when running a combined Portrait and Group event. Use these radio buttons to select whether you are currently taking individual portraits or group images. When group images are selected, several can be taken sequentially and then the Next and Previous buttons (see above) used to find the best image and the Accept Image button (see above) used to accept that image; the remainder are discarded. For the individual images to be correctly associated with these group images it is essential that the group selected by Select Group (see above) matches that selected when the group image is taken. Note: a particular group image does not need to be taken at the same time as the individuals from within that group, it can be taken earlier or later, it is only important that the selected group names match when the images are being taken.
![]() When ticked it is assumed that images have been taken remotely and that they are they are therefore likely to be using different camera settings to normal (eg taken out of doors), therefore the normal checking of the camera settings is not done. Use with caution!
When ticked it is assumed that images have been taken remotely and that they are they are therefore likely to be using different camera settings to normal (eg taken out of doors), therefore the normal checking of the camera settings is not done. Use with caution!
![]() Available at all times. Rotates the image clockwise. Note: this should generally not be necessary once a default rotation has been set up for portrait images in the Program Settings. To rotate multiple images select them using the thumbnail pane and the context menu (right click).
Available at all times. Rotates the image clockwise. Note: this should generally not be necessary once a default rotation has been set up for portrait images in the Program Settings. To rotate multiple images select them using the thumbnail pane and the context menu (right click).
![]() Available at all times. Rotates the image anti-clockwise. Note: this should generally not be necessary once a default rotation has been set up for portrait images in the Program Settings. To rotate multiple images select them using the thumbnail pane and the context menu (right click).
Available at all times. Rotates the image anti-clockwise. Note: this should generally not be necessary once a default rotation has been set up for portrait images in the Program Settings. To rotate multiple images select them using the thumbnail pane and the context menu (right click).
![]() Available at all times. See section Image Test.
Available at all times. See section Image Test.
![]() Available at all times. Gives access to some additional, less commonly used controls. See More Controls.
Available at all times. Gives access to some additional, less commonly used controls. See More Controls.
![]() Available at all times. Opens the current image in your image editing/viewing software (see Program Settings for configuring this software), allowing you to edit your images to, for example, remove marks from them.
Available at all times. Opens the current image in your image editing/viewing software (see Program Settings for configuring this software), allowing you to edit your images to, for example, remove marks from them.
![]() Available at all times. Sets the current display "crop". Images are not normally displayed full frame by ProofStation instead they are displayed cropped to the proportions that they will typically be printed at eg. 10x8, 9x6 etc. Note the images files are never actually modified, the stored image file is still the full frame image. We refer to this as a virtual crop. See also cropping images in the Main Image pane.
Available at all times. Sets the current display "crop". Images are not normally displayed full frame by ProofStation instead they are displayed cropped to the proportions that they will typically be printed at eg. 10x8, 9x6 etc. Note the images files are never actually modified, the stored image file is still the full frame image. We refer to this as a virtual crop. See also cropping images in the Main Image pane.