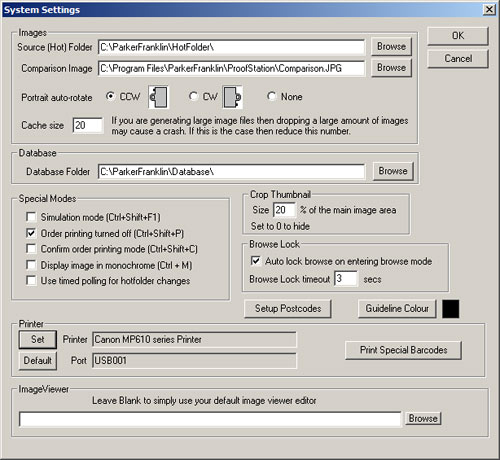
Source (Hot) folder
This is the “hot” folder where your camera has been set up to place its images. ProofStation will automatically detect and load any images appearing in this folder. Use the Browse button to select the required folder
Comparison Image
Use the Browse button to select the comparison image. See the comparison image in the Control pane page.
Portrait auto-rotate
Click on the camera rotation you would normally use when taking a portrait format image. All images come from most cameras in landscape format; ProofStation uses this information to automatically orientate portrait images so they appear correctly on screen. Some cameras will automatically do this themselves, in which case you should select None. When shooting a Group job type this auto rotation is ignored - the assumption is that groups will almost always be shot in landscape format.
Cache Size - to facilitate faster browsing ProofStation holds the last few images in memory so they don't have to be re-read from disk if you browse them. However if you use very large images (greater than around 2500 x 3000) this can lead to memory problems. No matter how large (or small) a JPEG image file might be, once in memory the amount of memory used is determined purely by its dimensions. An image of resolution 2500 x 3000 will take at least 180M in RAM. 20 such images cached will use 3.6G of memory and this level of memory use can lead to program crashes. If you find ProofStation occasionally crashing when you are working with very large images then try setting this cache to a lower value.
Database Folder
This is the default database folder where a new event will be stored. Note: when continuing a previous event it will automatically be set to the folder of the selected database, if that is a different location to your normal working location you will need to reset it to your normal location when you start a new job. This can be done either here in Program Settings or in the dialog where you enter the event code and name. Use the Browse button to select the appropriate folder. Note databases are themselves folders named along the lines of “Event_My Event_123456110124_database”. The database folder referred to here is the folder that will contain this event folder, not the event folder itself.
See the Special Operating Modes page for a description of these.
Set
Click this button to set up the default printer you want ProofStation to use. Leave blank to use the current Windows default printer (this setting will override not change the Windows default).
Default
Click this button to clear out the default printer. ProofStation will use the current Windows default printer.
Print Special Barcodes
Click this button to print the special barcode page (see Running Events). Note: the page will not be printed immediately. It will be printed when you have returned to the main part of the program (where the data to do the printing is available to the software). See also the Special Barcodes appendix.
Specify how large you want the virtual crop thumbnail to appear (in the upper right of the Main Image pane). It is specified as a percentage of the main image area.
If a new photograph is taken whilst in Browse Mode, ProofStation will automatically switch out of browse mode and accept the image. If browsing is locked, the image will be queued and only brought into ProofStation after browsing is exited. This is useful if an assistant is going through images with a customer whilst the photographer is continuing with the next customer. By checking "Auto lock browse on entering browse mode" the browse lock will be automatically set whenever browsing is entered. The timeout allows ProofStation to release this automatic lock if there has been no activity for the specified number of seconds.
This is for internal use by Parker Franklin only.
Use this button to set the colour that the guidelines are displayed in (see Main Image pane).
When the View button int the Control pane is clicked the current image will be opened using whatever software your computer has configured as the default viewer for JPEG files. If you wish a different program to be used then browse to and select that program here. It will typically be found in a location such as C:\Program Files\Adobe\Adobe Photoshop CS4\Photoshop.exe (for Adobe Photoshop).