The images displayed on your computer screen may look quite different to the image that will be finally printed. This can be due to a number of factors; the colour balance of the screen may not have been set up correctly, the brightness of the screen is purely relative and the apparent brightness can be affected by the ambient light. Consequently a known “good” image that will produce a well balanced print is required as a comparison and you must get your images to match this “good” comparison image as closely as possible. A suitable comparison image is supplied by Parker Franklin and is installed along with the software or one of your own can be selected from the Program Settings (see Program Settings). However, it is important that you have this image checked by Parker Franklin to confirm that it will print perfectly.
This comparison image is always displayed as a small image in the lower right corner of the program to give a continuous check of quality, however to get your camera and light settings correct you need to do an Image Test which will normally be the first thing done when an event is started, after setting up the lighting.
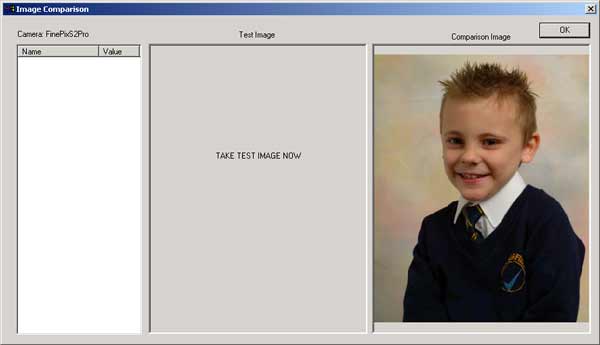
Click Image Test and the following dialog will appear:
The right pane shows the current comparison image, the middle pane will show the test images you take (you can keep taking as many as you like until you have it right), the left pane shows the current settings on your camera. The dialog can be made bigger or smaller by dragging its corners. After taking an image the dialog changes as shown:

The left pane now shows a selection of the camera settings that were used for this test image. These settings are acquired using EXIF data. Unfortunately each camera manufacturer typically uses different EXIF tags for this data, so a Camera Settings file is used; the example above is using settings for a Fuji Fine Pix S2 Professional. The Camera Settings file is installed along with the ProofStation software and covers most professional digital SLR cameras. When you run the program you will be asked to select which camera you are using. If your camera is not listed you can still use the default settings which provide a basic set and contact Parker Franklin to request your camera be added to the Camera Settings file. Once you are happy with the image click OK and these camera settings are stored and compared against every image taken whilst the program is running. If they are found to be different, a warning is displayed to alert you. The only settings that you can change here will typically be the aperture and shutter speed. There are other important settings that are also monitored as “Required Settings”; see below. Note: Images retrieved from a remote source i.e. Flash Card will not be tested.
In addition to the settings used to check the image density there are other important settings which will affect the final quality of your prints. Parker Franklin has taken a great deal of time to determine the best settings to use on each camera to get perfect results on our digital printing system. If these settings are not used then we cannot guarantee your final image quality. Our digital printing system has software that duplicates many of the functions found on modern cameras and if you do not use our recommended settings it is possible that the camera and the printer may both apply the same correction (such as sharpness for example) and produce an over corrected result. If you take an image that does not match the required settings a warning will be displayed.
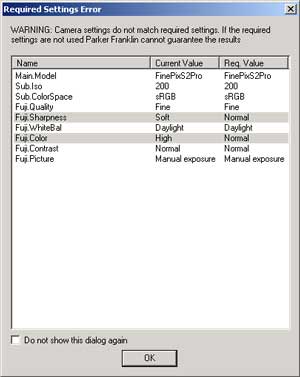
| If you do not use the Required Settings then Parker Franklin cannot guarantee the quality of your prints. |
As well as the above tests for image density etc. it is also important to check for marks on your camera’s CCD (Charge Coupled Device, the capture area of your camera); any dirt will be replicated on every image. This is probably best done a day or two before the event. Marks can be detected by doing a do a grey card test. You can use a clean piece of grey card or a Kodak Grey card. Take an image with the card filling the screen and check there are no marks showing. To clean your CCD please refer to your camera’s operator manual. We recommend Sensor Swabs and Eclipse Cleaner. Note these marks can be almost impossible to see on screen when they are against a white backdrop, but they are typically very obvious on the final print, if you do not ensure your sensor is clean before an event you may get re-touching charges for every print ordered.
|
Parker Franklin may make a charge for each image that needs marks removed. |