User Interface
The Main Image Pane
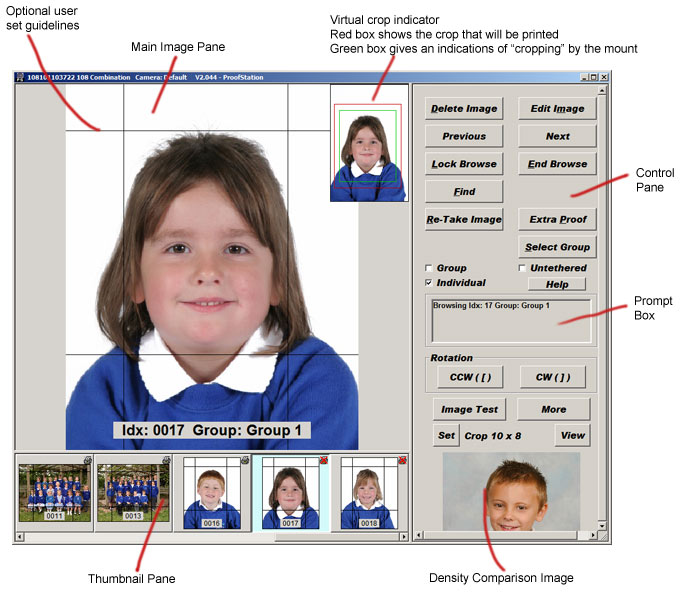
This display will show each image as you take it. The orientation is determined by your preferences as entered in the Program Settings, though it can be re-orientated manually. This image allows you to determine whether or not you wish to use it; you can always take another! There are a number of operations you can perform within this pane:
- When browsing through images that have already been taken, a lower resolution image is used for a faster update. Double clicking anywhere within the main image display area will load the full resolution image in its place.
- The image is automatically displayed at your desired crop proportion, so what you see is what will be printed. The actual file is not affected, it is just being displayed as it would be printed.
- Clicking and dragging with the mouse will zoom into the area you have selected. This is particularly useful for checking eyes for blinking in a large group image.
- When zoomed in, scroll bars will appear allowing you to navigate to other parts of the image in the normal Windows way.
- The rotate buttons or the thumbnail menu can be used to rotate the image.
- Right click anywhere on the main image and you can create (or remove) horizontal and vertical guidelines – these can be useful to assist with virtual cropping (see below) to get all images consistent. See Program Settings to set the colour of these guidelines.
Virtual Cropping
You can do all your cropping of the images in ProofStation and we recommend doing this rather than using another application such as PhotoShop. The reason for this is the cropping in ProofStation is virtual. That is, no changes are actually made to the image file, instead the crop settings are retained in the database and applied before the image is displayed or printed. Therefore all of the original image is retained, allowing the crop to be loosened later if it is found to be too tight.
The main image will always be displayed using your current crop (see Set in the Control Pane). The crop indicator in the top right (see picture at top) shows the full frame image with the current crop shown by a red box. A second green box gives an indication of the effective crop after the final print is placed in a mount. This is only approximate as the actual amount of margin lost to the mount depends on the size of the mount; smaller mounts will cover a proportionately larger amount of the print than larger ones.
Cropping controls
- Shift and drag within the main image area to define the area you want to crop to. The proportion of your crop will be constrained to the current display proportions that you have selected (see Set in the Control Pane).
- Shift and click within the main image area to remove all cropping.
- Click and drag within the virtual crop indicator to reposition your crop
- Fine tune the crop with the following hot keys:
- Alt + < to zoom out / reduce the crop
- Alt + > to zoom in / increase the crop
- Alt + Up to move the image up within the crop (move the crop down)
- Alt + Down to move the image down within the crop (move the crop up)
- Alt + Left to move the image left within the crop (move the crop right)
- Alt + Right to move the image right within the crop (move the crop left)
Copyright © 2009 Parker Franklin Ltd. www.parkerfranklin.com