User Interface
The Thumbnail Pane
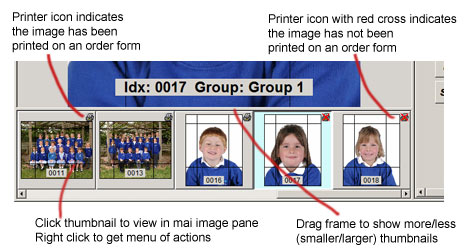
This area allows you to quickly scroll to and select any image in the database. With one or more images selected a right mouse click allows a number of different actions to be performed (see below). The number of thumbnails displayed and their size can be changed by dragging the divider between the thumbnail area and the main image area. The thumbnails support the standard windows mouse click conventions:
- Single click selects the one image
- Control click adds/removes an image to the selection
- Shift click selects all images between this image and the previously selected image
- Control + A selects all images
Sometimes the image surround may have a different colour to that shown above:
- If the image has special instructions then the surround is shown in red.
- If the
image has special instructions flagged for Parker Franklin's attention then the surround is shown in green.
Right clicking a thumbnail or selection of thumbnails will present a menu of options:
- Print multi-image proof order - prints a proof order form for each of the selected images with multiple images on each form (depending on the order form layout settings). If more than 5 images are selected and the job is portraits with assocaited group names you will have the option to print the forms out in group order.
- Print individual proof order - prints proof order forms for each of the selected images with just one image on each order form (no matter what order form layout is used). If more than 5 images are selected and the job is portraits with assocaited group names you will have the option to print the forms out in group order.
- Print multiple orders from each image - allows multiple orders forms to be printed for each image (primarily designed for use on group jobs).
- Print group verification sheet - prints out a new group verification sheet for the selected image on group jobs. This is generally printed automatically after the group image has been accepted. But this allows a new one to be printed in the event of problems with the original (printer failure etc).
- Print image full page - prints the selected images full page on whatever printer is currently set up (the full resolution image is used). This is primarily designed for use with dye-sub printers allowing photographic quality prints to be generated.
- Print multiple copies of image full page - prints multiple copies of the selected images full page on whatever printer is currently set up (the full resolution images are used). This is primarily designed for use with dye-sub printers allowing photographic quality prints to be generated.
- Reprint all printed images in selection - reprints multi-image order forms for all images in the selection that have already been printed before. If more than 5 images are selected and the job is portraits with assocaited group names you will have the option to print the forms out in group order.
- Set proof order printed - sets the proof order printed flag for all images in the current selection (can be useful with the "Reprint all printed images in selection" option above.
- Clear proof order printed - clears the proof order printed flag for all images in the current selection (can be useful with the "Reprint all printed images in selection" option above.
- Image Details - view and edit details about the image such as the associated group or SIMS data (see Edit Image in the Control Pane for more details). This is also where you can add special instructions.
- Swap subject data - only available when exactly two thumbnails have been selected. Intended for use on SIMS jobs and in particular if there are say two images per subject of which only one is associated with the SIMS data and it is necessary to switch the one that is associated.
- Set group name - Change the group associated with the selected images.
- Toggle composite tag - see Composites.
- Reset composite tag count - see Composites.
-
Copy selected images - Copies all the selected images out of the database to a selected folder.
- Copy selected images with adjustments - Copies all the selected images out of the database to a selected folder applying any cropping adjustments.
- Delete image - removes the selected images from the database. Note the image file itself is not deleted and remains in the database images folder.
- Filter - there are three filter choices.
- All - all images in the job will be displayed. On exiting browse it will always revert to this filter
- Only those printed on order forms - only those images that have not already been printed on order forms will be displayed
- Only those not printed on order forms - only those images that have not yet been printed on order forms will be displayed
- Rotate CW - rotate the selected images clockwise.
- Rotate CCW - rotate the selected images counter clockwise.
- Apply last zoom and crop - takes the zoom and crop settings of the last image for which they were set and applies them to the selected images.
- Generate web order - opens an internet browser to the OrderMyPhotos order page using the order reference for the selected image. Requires the computer to be connected to the internet.
- Upload Thumbnails to Web - allows you to upload thumbnails of the event images to the web so they will be visible when customers have entered their order reference number (the customer is also given the option online to have the image removed after they have finished their order). You will be presented with an options dialog - see below for details.
Larger image sizes and/or better quality JPEG compression will result in larger thumbnail image file sizes and so increase the time to upload your thumbnails.
Apart from the time taken, there is no problem with uploading twice if you should change your mind about the settings; the existing thumbnails will simply be overwritten
Note: thumbnails will appear on the
web site with the same orientation and cropping as in ProofStation. If you have a mixture of portrait and landscape orientations and you want them to appear correctly then you should ensure they appear correctly in ProofStation before uploading them.
- Upload Images To Web Gallery - this option allows you to directly upload your images to our free web gallery allowing your customers to order by browsing the images online. Please see the notes below. Because we are dealing with larger images than the thumbnail option above we have provided a verification feature as well. Note that if you are using the web galleries then you do not need to upload thumbnails as well they will automatically be picked up from the galleries.
- Verify Web Gallery Images - confirm that all web gallery images have upload with no errors.
Upload Thumbnails to Web Dialog
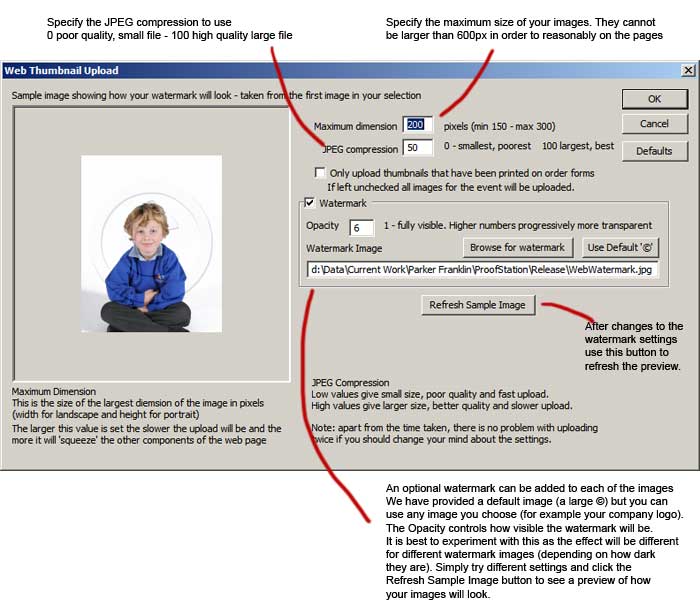
There is another option not shown on this image to upload all images for the event or only the currently selected images.
Web Gallery Images
Parker Franklin provide a free web gallery for you to use if you would like your customers to be able to choose the images they wish to order by browsing the images online. Any event can be set up to use the gallery it is your choice whether you consider this to be the best way for your customers to order (as opposed to proof cards or proof order forms).
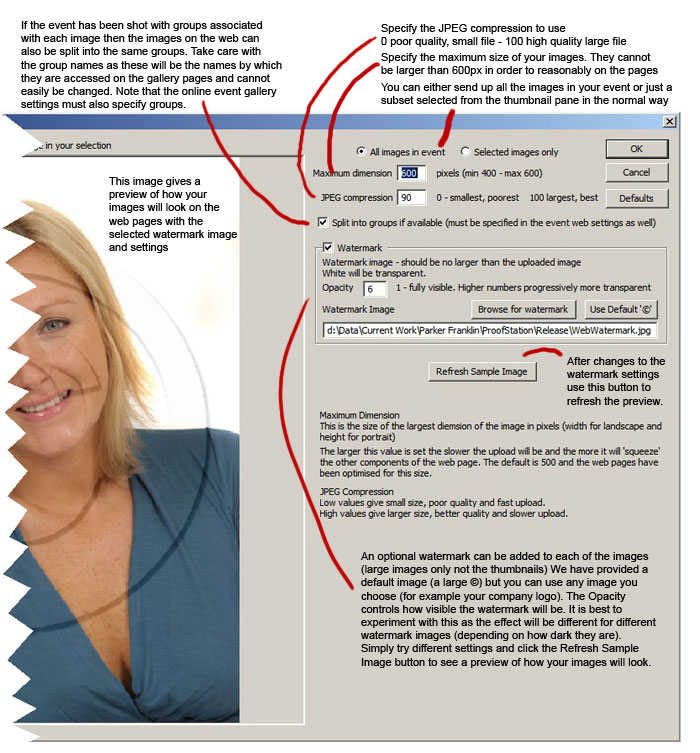
Smaller copies of your images will first be created locally in your event folder using a new folder named with the first 6 digits of your event code. Within this folder three separate folders will be created; thumbs, bigthumbs and images. The images in "thumbs" will have a maximum dimension of 150px and medium JPEG compression, the images in "bigthumbs" will have a maximum dimension of 300px and slightly better quality JPEG compression, the images in "images" in have a maximum dimension specified by you (up to 600px) and a JPEG compression setting also specified by you. The largest images can also have a watermark applied to them. This watermark can be constructed from any image (though it should be a size appropriate to your chosen large image size). We have provided a default watermark image which is just a large copyright © symbol.
After these local images have been created they will automatically be upload to the OrderMyPhotos web site and your customers will immediately be able to begin ordering from them. If you would like to a see a sample of the web gallery please go to www.ordermyphotos.co.uk and there are two events there in June 2010 called "Event with gallery and groups" and "Event with gallery and no groups". You can have a browse around, add images to your shopping cart etc. However please do not check out - the site will quite happily accept orders from these sample galleries (and debit your card!!!).
Below is the dialog for setting up the upload along with notes on the various settings:
Copyright © 2009 Parker Franklin Ltd. www.parkerfranklin.com