Note that this mechanism has now been largely replaced by simply dragging and dropping the image files into ProofStation. Altogether much simpler!
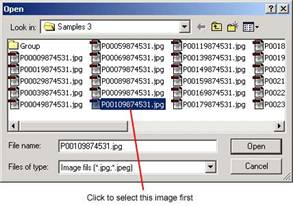
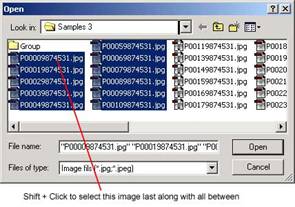
It is possible to take images remotely when disconnected from the computer and then load them into the database later. This is useful if for example group images are to be taken outdoors. The images are taken with the camera disconnected from the computer and the images being stored on the camera’s memory card in the normal way. It is strongly recommend that the same number of shots are taken of each subject, as this will make later collection much easier for you. After this is complete and you have returned to the computer plug the memory card into the appropriate connector and click the Collect Remote button. You will be asked to browse to and select the images that you wish to collect. Navigate to your memory card and, using the shift and control keys to allow multiple selections, select all the images you wish to collect from the card. Note: the first image that Windows passes to ProofStation will always be the last one selected and thereafter in the order they appear in the dialog, therefore it is best when selecting to select the first image last. As shown below:
Once you have selected the images to be collected, the collection dialog appears showing a list of the selected images (which cannot now be changed, though the whole process can be aborted and restarted).
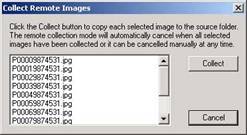
Whilst this dialog is available, all normal program operation and controls are active behind it, so move it to a convenient place on the screen where it is not obscuring information and controls you may want to use. Now clicking the Collect button will place each image sequentially into the “hot” source folder just as if you were taking the images in the normal “tethered” fashion and each should be processed in the normal way. So, for example, if the first four images are of “Group A” then you would go through the following sequence:
Once all the images have been processed the collection dialog will automatically be closed, though it can be closed manually at any time by clicking the Cancel button.
An alternative to using the Collect Remote button is to simply use Windows Explorer or My Computer to browse to the folder containing the images and then drag and drop them into ProofStation. Since being added into ProofStation this has become the more common way to do this job.
Note: whichever way you do this, the images are always copied from the source location (memory card); the original always remains. If you attempt to collect an image that is already present in the hot folder (previously collected) it will fail to copy it. After running a remote collection it is probably advisable to clear the collected images from your memory card (any that have not been accepted will still be present in the hot source folder and will not be lost). Note: Images retrieved from an outside source eg. Flash Card will not use the comparison image test settings (see Image Test).