When ProofStation is run there is always an initialisation start up sequence of dialogs. Exactly which dialogs will appear depends on the kind of job and whether it is a new job or a continuation of an existing job.
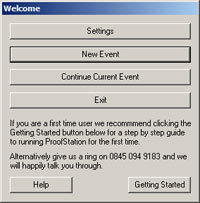
The first dialog is always the same. You can click Settings to go into Program Settings. Note this can also be done at any time whilst the program is running using the More button.
If this is the first time the job is being run click New Event, if the event job database has already been created then click Continue Current Event to continue with an existing event.
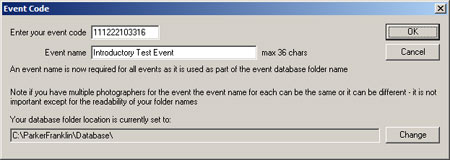
Enter your 12 digit event job code (any spaces will be ignored). See Booking an Event for getting these codes or the Practice page for some practice codes. The event name is used as part of the generated database folder name. Check that your current database location is correct; this is the location where your new event folder will be created and it may have been changed if you had continued an event in a different location at some time. Click the change button to change it if necessary.
Click OK and the database will now be created. The folder name generated for the example shown would be Event_Introductory Test Event_111222103316_database.
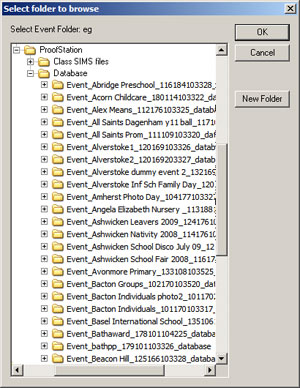
You will be asked to select the event database by selecting the event database folder. This is the folder created when the job was first created with a name of the form Event_Introductory Test Event_111222103316_database. The location where the database will have been created is dictated by the Database Folder field in Program Settings. Navigate to and select the appropriate event folder and click OK.
Note that continuing an event will automatically set the default program Database Folder to the parent folder of this event folder (".../ProofStation/Database" in the example shown).
The software will now skip to the Enable Printer dialog (see below) as all the information below will already be held in the database.
There are a number of additional files that may be required depending on the nature of the job you are doing and whether you want some custom products. The dialog below will appear allowing you to select which files you want. Although you can still copy the relevant files across manually and just ignore this dialog, using this method will ensure all the files have the correct names (essential for our backend systems to function correctly), allowing you to use your own descriptive names for these files on your systems.
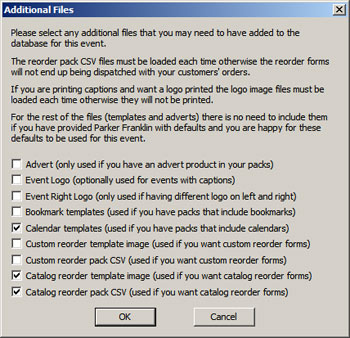
Advert
If you have included an advert product in your event then we will print this image to 8" x 6" and include a copy in every order we send out allowing you to include any additional promotions you wish on a per job basis. You can provide Parker Franklin with a default image to use with all of your events and/or provide a custom iamge for use on individual event. In the latter case you should tick this box and provide the appropriate image. The advert image itself should be an 8" x 6" JPEG at 300 dpi resolution.
Event Logo
If you are running a job that will have captions printed under the image (typically a group job) then you may wish to have a logo printed with the captions (eg the school crest). If so then you will need to provide an image to be printed (please speak to Parker Franklin about appropriate sizes and structure of this logo).
Event Right Logo
If you printing your event logo twice (once on either side of the captions) then by providing this second logo image you can have a different image appear on each side.
Bookmark Templates
If you have bookmarks in any of your packs then you have the option of either going with the Parker Franklin default style or providing your own. In the latter case you can provide Parker Franklin with default images to use with all of your events and/or provide a custom style for use on each event. In the latter case you should tick this box and provide appropriate top and bottom images for the bookmark. Instructions for generating these files along with templates can be downloaded in the "ProofStation Templates" zip file from our downloads page at www.parkerfranklin.com/downloads.
Calendar Templates
If you have calendars in any of your packs then you have the option of either going with the Parker Franklin default style or providing your own. In the latter case you can provide Parker Franklin with default images to use with all of your events and/or provide a custom style for use on each event. In the latter case you should tick this box and provide appropriate images for portrait and view for either or both large (10x8) and small (8x6) calendars (depending on which sizes you have in your packs). You will also be asked what year your calendar is for; this will be embedded in the name of the copied file. Instructions for generating these files along with templates can be downloaded in the "ProofStation Templates" zip file from our downloads page at www.parkerfranklin.com/downloads.
Reorder Files
When we print reorder forms they are printed on an 8x6 print and there is an area at the bottom of the form reserved for you to add information about the contents of the packs being offered, promotional information and ordering instructions including somewhere to put their name and address if you are allowing ordering by post. This is provided as a JPEG image that will be printed at the bottom of the form. There are two types of reorder forms; a catalogue reorder form and a custom reorder form. Each requires a different size of image. You can provide Parker Franklin with default images to use with all of your events and/or provide a custom style for use on each event. In the latter case you should tick either the custom or catalog reorder template image box and provide an appropriate image. Instructions for generating these files along with sample templates can be downloaded from our downloads page at www.parkerfranklin.com/downloads. In either case you should tick the appropriate reorder pack CSV box and provide an appropriate pack CSV file for the products to be made available on the reorder form along with their prices. You cannot provide Parker Franklin with a default file in this case as the file needs to be loaded into the database itself at this stage. However a template catalog reorder pack CSV is available in the "ProofStation Templates" zip file which can be downloaded from our downloads page at www.parkerfranklin.com/downloads this already has all the products in it that we offer in our catalogue and you will only need to edit the prices that you want to sell the products for and set up the correct service (full, data entry or return only).
If any of these options have been selected you will later be asked to navigate to the appropriate files and open them (copy and/or import them).
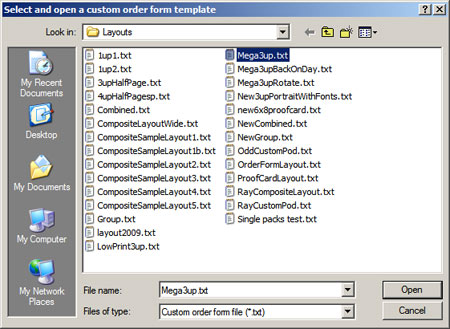
If this is a new event you will now be asked to select a custom order form template. This is a text file (extension .txt) that contains information about where to place the image, barcode, prices etc. on your order form. These files can either be obtained from Parker Franklin or be self generated using the ProofLayout software. If your layout requires a background image to be printed on the day (we recommend pre-printing the background for speed and economy) then a second dialog will appear for you to select the background image you wish to use.
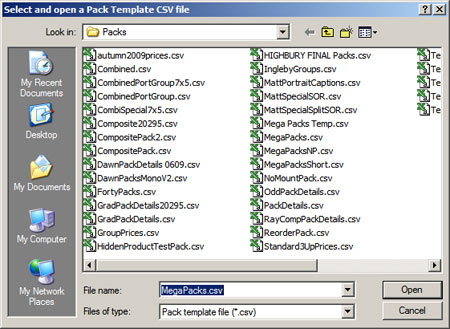
If this is a new event you will now be asked to select a Pack Template file. This is a CSV file (extension .csv) that contains information about the make up, names and prices of your photo packs.
These files can either be obtained from Parker Franklin or be self generated using the PackCoder software.
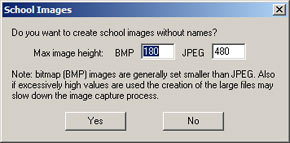
If this is a new event and not a SIMS event (school images are always generated for SIMS events) you will have the choice of creating a set of images for your school. If you click Yes an additional folder will be created in the event database called "EventImages" and below this two more folders for the actual images; one for the BMP images and one for the JPEG images. These images are normally small and their maximum height in pixels is specified in this dialog. After the event is complete the folders can be burnt to a CD and given to the school. If for nothing else, these images can be useful for you and the school in the event of parents/children losing their proof order forms, as the naming of the images allows you to easily find them again in your database.
If this is a new event you will now be asked for a number of pieces of additional information.
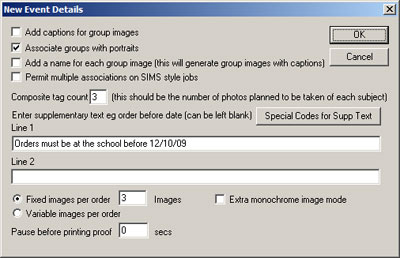
Add captions for group images: If you have group names then captions are automatically generated for group images but if not, this option allows you to manually add the captions for each group image.
Associate groups with portraits: In combined jobs this is always done automatically but when doing portrait only jobs it can still be useful to associate groups with photographs. For example this can allow Parker Franklin to easily organise all orders by class if they are all to be delivered back to the school instead of direct to the customer (we simply print them alphabetically by group/class), and it also makes it much easier to locate an image in the event of lost order forms.
Add a name for each group image: For group jobs this allows you to add a name for each group image that will be printed below the final photograph. For example this could be used to specify team names for sports team photographs.
Composite tag count: This is an auto tagging option for working with Composite prints (see Composites for more details).
Supplementary Text: There are now a maximum of 8 lines of supplementary text that can optionally be specified that will be printed on each order form (the location for these lines must have been set up in the layout file, see ProofLayout). For example, this could be used for things like last order deadline, school name etc. Each line is no longer identified by Line 1, Line 2 etc. as shown in the snapshot above; instead each line has a unique name set up in ProofLayout. The following special codes will insert data taken from the event:
Fixed Images Per Order: When set to a number other than one, ProofStation will only generate a proof print each time that number of images has been taken. Generally used in association with a custom order form layout that has that number of images being displayed on each order form. This allows multiple poses of the same subject to be printed on a single order form.
Variable Images Per Order: As above but this time it will only print the proof order forms when the Extra Proof button is clicked and then order forms for all images taken since the last order form was printed will be printed.
Pause before printing proof: Puts in a pause before printing the order form, during which time the photographer can delete the image (either with the Delete button or the space bar) so it will not be printed or included in the database.
Extra monochrome image mode: When this is selected ProofStation will generate a second monochrome image for every image that is brought in. Note that in this mode if you delete one image it will also delete the other (if you delete the colour one it will also delete the monochrome one and vice versa).
Print n
full size prints of each image on proof: (not currently shown on the image above). If 'n' is set to a value other than 0 then each time a proof order form is printed 'n' copies of each image on the order form will be printed full page on whatever printer is currently connected. This is primarily designed for use with dye-sub printers allowing photographic quality prints to be generated along with each proof order form.
Note most of these items can be modified at any time in the More Controls dialog.
You will now be asked if you wish to start with printing enabled. This determines whether or not ProofStation will automatically print order forms as images are taken. If you prefer to manually select the images to print order forms from, or possibly print the order forms later after the event is completed then select no. Note: this does not completely prevent you from do any printing, you can still manually print order forms using the Extra Proof button, or the thumbnail menu; it simply stops the automatic printing. The printing can easily be enabled/disabled later either from the More Controls dialog or using the shortcut Ctrl + Shift + P.
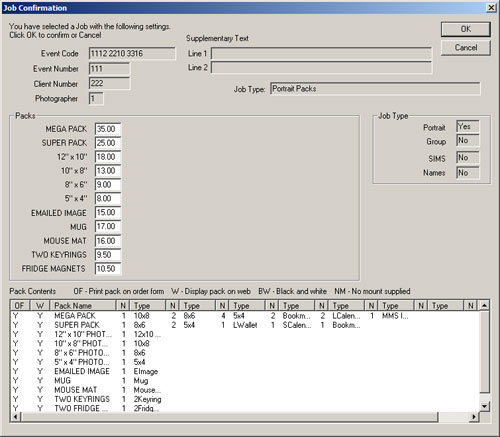
You will now be presented with a Job Confirmation dialog. This displays most of the information that you have entered so far including the pack data loaded from the Pack Template file. Please do take the time to check this carefully to ensure that, in particular, the job type and the pack prices, descriptions and contents are correct; it is quite hard to change these later.
If this is a job with individual names – either group names or a SIMS style job – then you will now be asked to import the names data. If this has already been done (you are continuing an existing job) then this dialog can be ignored, but it does allow the names data to be printed at a later date when continuing the job.
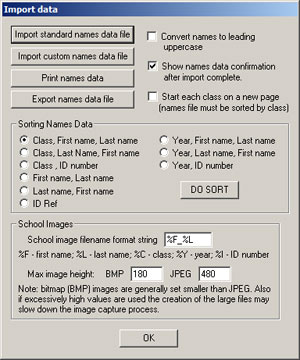
A names CSV file must be provided by the school in either a standard or custom format (see Appendix SIMS and Names Data Formats for details on these formats. Click either of the two import buttons as appropriate – it is important the option to show named data confirmation is checked and this should be checked carefully (all the way to the end) to ensure that there were no mistakes in the format of the file. Sometimes the names data you receive will have all the names in uppercase and if using this data to print captions it is probably more appropriate to have them in leading uppercase only; check the Convert names to leading uppercase to convert names like MIKE FRANKLIN to Mike Franklin - this must be checked BEFORE doing the import.
Before printing the names data (see below) it may be useful to sort them. Select the preferred sort order from the available options and click the DO SORT button.
To print the names data click the Print names data button. This will print each name with a barcode, 12 names to a page. It can be useful to use perforated paper so these can easily be split up and handed out to each subject. To start each class on a new page the names data file must have been sorted by class and the check button selected. Note that the actual pages will only be printed after the initialisation process is complete.
The Export name data file button allows the names data in ProofStation to be exported to a new CSV file. This can be useful if you have edited names data (for example adding new entries for missing children) and need to make changes to the file such as class names etc before re-importing it.
For SIMS data you can control the format of the small image files created for the school. So for example "%F_%L" would generate names like "John_Smith.jpg" or "%I %L %F" would give "1234 Smith John". If class information is available these images will be generated in separate folders for each class. The size of these images can be set by specifying the maximum image height (in pixels).
A dialog will now appear asking you to select your camera type from a list. If your camera type does not appear either select "Default" or speak to Parker Franklin and we can add your camera to the list. This will load a set of required camera settings (such as resolution, colour space etc.) for optimum results appropriate to your camera. As you take each image it will be checked against these settings to ensure you have not accidentally changed them. If you are not happy with the required settings for your camera we can create a custom set of setting for you after we have extablished that they will be appropriate for our lab.
Now click Image Test to take your test images and get your lighting and camera settings set up. See the Image Test page.
You are now ready to begin taking the photos!