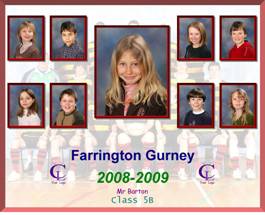
Composite prints such as the one shown (all the horrible colours and fonts are just to show that it can be done!) can easily be generated using ProofStation. First a Composite template is generated using CompositeLayout (See CompositeLayout page). This template can potentially be used for many different events as each event loads its own background image and logo (school crest). Then some composite products are added into your event packs (See PackCoder page).
When the event is run and you have selected the Pack CSV with your composite products in it you may be asked to open a background image and a logo image (if your composite layout requires them). Once you have navigated to these files and selected them, ProofStation will copy them into your event database, along with the Composite Layout template itself, so they can be used to generate the final composite prints by Parker Franklin’s back end image printing software.
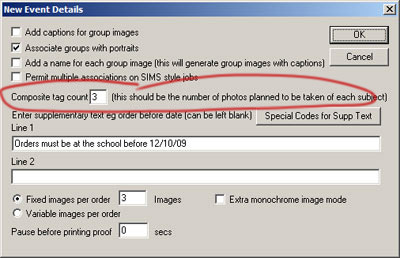
When the new event details dialog appears there is a composite tag count option. If you are taking multiple poses of each subject then obviously only one of these poses should be used when generating the composite image. Which pose should be used is indicating by tagging it. Whilst this can be done manually it would obviously be a considerable nuisance to do so. Therefore so long as you can be consistent with your poses it can be automated. For example if you are taking three poses of each subject; one sitting, one full length and one head and shoulders and you want to use the head and shoulders shot for the composite you would set the tag count to three and ProofStation will automatically tag every third image.
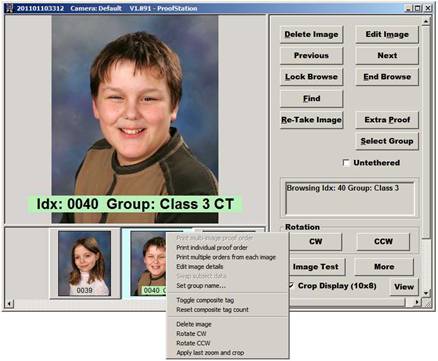
When browsing the images that have been taken it is very easy to view and change the tagged images. Each tagged image will have its index data highlighted in green as shown (normally it has a grey background) and has the letters CT at the end. To change the tagging, simply select the thumbnail of the image(s) to be modified and right click to get the menu shown. Clicking Toggle composite tag will switch the tagging on all the selected images. If only one image is selected the option to Reset composite tag count will also be available; clicking this option will set the tag on the selected image and then using the same tag count discussed above will run through all the images from this one to the end of the job setting the composite tag for (in our example) every third image.
When you are taking your images you will need to click Select Group to change each group and when doing so you will need to enter the caption data for that group (assuming you have selected to have captions in you Composite Layout – it is optional).
With composite prints it can be quite important to have consistent zoom on all the images - they tend to look a bit messy if all the subjects are different "sizes". Using guidelines with virtual cropping can make this a lot easier. See Main Image pane.
That’s all there is to it. After Parker Franklin have received your event database and the orders start to come in, our back end software will automatically construct the prints, selecting all the tagged images that are in the same group as the image being ordered.
Note that if you are doing a SIMS job the composite tagging will not be required; the images that have been selected to for the SIMS database will be used instead.