Running The Event
Running a Group Event
With your camera connected to the computer and set up to place JPEG images into the source folder specified in the Program Settings you are ready to take images. With group images it is far more likely to have images with one or two bad expressions, blinks etc. therefore it is normal to take multiple images of each group. ProofStation will stack these images up allowing you to browse through them and accept just the best image.
If, as is common with group images, you are taking the images "un-tethered" then follow the instructions in Remote Operation and then continue with the instructions below.
- Take several images of your group subject.
- With the Previous and Next buttons browse through the images for the best one. Note: you can zoom in by clicking and dragging an area of the main image allowing you to check things like the eyes for blinking.
- When you have chosen the best image click Accept Image.
- A dialog will appear asking how many order forms you would like printed. Enter an appropriate number to print order forms for each subject in the group.
- The accepted picture is copied to the database and the order forms are immediately printed with the proof image on them. For a large group this may take a few minutes and it is probably best to begin getting the next group ready whilst waiting.
- Give the order forms to the subjects or their guardian/teacher
- You may continue accepting images or click End Acceptto reject the remaining images. Note: the rejected images will not be deleted (in case you should realise later that you need them) and should therefore be manually deleted from the hot folder at a later date.
Groups With Names
You should have a printed copy of the special barcodes and have printed out and distributed the name slips with their barcodes (see Program Initialisation - Import Data).
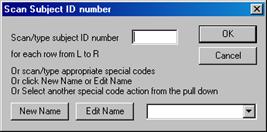
- Proceed as for simple groups above. After clicking Accept Image you will need to scan the barcodes of each person in the group in the order they are arranged from front to back and left to right. It is probably best to get them to file over to you in order. The Scan Subject ID Number dialog will appear.
-
First, scan the special barcode Start Row 1, then scan each person in the first row (from left to right). When you have scanned all of row 1 scan the special barcode Start Row 2 and repeat the process for the second row. Repeat for up to 6 rows. When all the subjects have been scanned, scan the special barcode End Group. See Appendix 2 for our recommended barcode scanner.
- Instead of scanning the special barcodes (for example if you have not got them with you!) you can click the New Name button to add a new name, the Edit Name button to correct an incorrect name or any of the other actions from the pull down list (these include the start row actions).
- The accepted picture is copied to the database and a dialog will appear asking how many order forms you would like printed. It is possible that more forms will be needed than the number of subjects.
- You will now be prompted to place a blank piece of paper in the printer for the verification form. This form allows the event host representative (eg. teacher) to check that the names are all correct, add any corrections and sign it. The signed form should be sent back to Parker Franklin along with the database CD/DVD so we can make the necessary corrections before printing. It is vitally important to get this confirmation done. If not, and we send out prints with mistakes you may get charged for sending out replacements.
- Now click OK. You will be prompted to place the pre-printed order forms back in the printer (if they were removed) and the order forms are immediately printed with the proof image on them. If this is a large group, this may take a few minutes and it is probably best to begin getting the next group ready whilst waiting.
- Give the order forms to the subjects or their guardian/teacher.
Copyright © 2009 Parker Franklin Ltd. www.parkerfranklin.com